Importing measured spectra from a Zeiss ThinProcess database |
  
|
Importing measured spectra from a Zeiss ThinProcess database |
|
You can connect to a Zeiss ThinProcess database, select a sample and measurement position and load all measured spectra for analysis. A suitable database driver must be installed on your computer in order to get a connection to the database. We recommend to install the Microsoft native SQL client SQLNCLI11. A setup routine is available at the Microsoft website. In addition, the Zeiss database must be configured in such a way that it allows remote access from your computer. If this is not the case you should contact your network administrator and/or Zeiss directly.
All settings and actions are done in a dialog which is explained below. You can open this dialog in the following ways:
1.Execute the global menu command Actions / Spectra / Import / Import all spectra from a Zeiss ThinProcess database. This command opens a modal dialog which shows the ThinProcess table (see dialog explanations below). The program execution of SCOUT (or CODE) is blocked until the dialog is closed.
2.Execute the global menu command Actions / Spectra / Import /Show Zeiss ThinProcess database table. The command opens the ThinProcess table in a separate window which can be kept open while you continue to work with SCOUT or CODE.
3.Execute the script line 'import all spectra from a zeiss thinprocess database' in a script object, placed in one of the views. This script command show the modal version of the dialog, i.e. program execution is blocked until you close the dialog.
4.Execute the script line 'Thinprocess show' to open the ThinProcess dialog in a non-modal version.
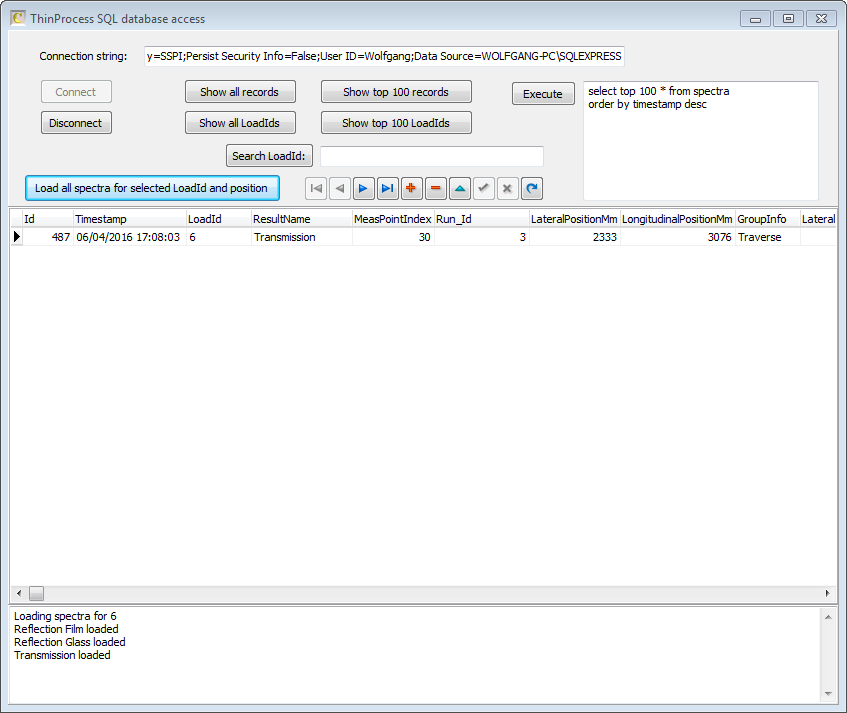
The ThinProcess dialog looks like this:

The line at the top contains the so-called 'connection string' - this defines details of the connection to the ThinProcess database. Finding a working connection string might be difficult - you can consult the Zeiss ThinProcess documentation or contact us for help. Before you try a connection string you should verify that a network connection to the database server exists - you could open a Windows command line (cmd.exe) and execute the command ping followed by the IP address of the server, like 'ping 192.168.2.13' (the IP address of this example must be adapted to your situation, of course). You should receive a server reaction within a few ms.
The connection string is saved in the file default_values.ini in the user directory (where the license file sits) when you exit the program and loaded again when you start.
Once the database connection is established you will see the last 100 spectra that have been stored in the database. The SQL command 'select top 100 * from spectra order by timestamp desc' has been executed. You can send some pre-defined SQL selection commands by clicking the buttons Show all records, Show top 100 records, Show all LoadIds and Show top 100 LoadIds.
Please be aware that the commands Show all records and Show all LoadIds might take a long time to execute if the database table is large. You should avoid those commands unless you are sure that you are working with a small table.
If you want to see spectra of a certain sample only, you can enter the LoadId of that sample in the edit box right to the button Search LoadId and then click this button. Finally, you can define your own SQL selection statement in the upper right corner and click the Execute button.
Inspect the selected records and find the sample and measurement position that you are interested in. Place the cursor in one the rows that shows the wanted LoadId and the wanted position (identified by MeasPointIndex or the values LateralPositionMm and LongitudinalPositionMm. Then click the button Load all spectra for selected LoadId and position. The program will now select, one after the other, all records that belong to the same measurement point. In the example shown below there are 3 matching records, with ResultName = Reflection Film, Transmission and Reflection Glass. For each value of ResultName a spectrum object with matching name is searched for in the list of spectra. If a match is found the measured data are sent to the corresponding spectrum object. For the example shown here you must have at least 3 spectra in the list of spectra with names 'Reflection Film', 'Transmission' and 'Reflection Glass'. A successful data import is shown in the 'activity box' at the bottom of the dialog:
When the last spectrum has been loaded the dialog is closed automatically.
Useful script commands for ThinProcess work
thinprocess connect |
Executes the 'Connect' command. The connection string must have been tested before. |
thinprocess show |
Shows the ThinProcess table dialog in a non-modal version. You can close the ThinProcess window any time - its content is not deleted but the window is hidden only. The connection to the database remains valid. |
thinprocess send sql command,sql command |
Sends an SQL command to the ThinProcess database. If you can write the SQL command in one line you can put it directly into the script, after the comma:
thinprocess send sql command,select top 5 * from spectra
However, in most cases you want to write sql commands using several lines which is not possible in a single SCOUT script line. You can use the following mechanism to proceed: •Generate a view element of type 'Lines' and give it a short descriptive name like 'select_top_10' •Enter the SQL command you want to execute in ThinProcess as the text of the new 'Lines' object. You can distribute the SQL command on as many lines of text as you like. •Use the text function tag _function to send the content of the 'Lines' object as SQL command with several lines:
thinprocess send sql command,_function lines select_top_10
|
set temporary string,_function thinprocess,string,lateralpositionmm |
Tells the ThinProcess table to export the current value of the column 'lateralpositionmm' as string. The string is then copied to the temporary string used by several view objects. You can use the temporary string in a subsequent script line to set the value of a master parameter, like in this example:
set master parameter, position
If the command 'set master parameter' is missing a formula after the name of the master parameter it uses the temporary string to evaluate the new value of the master parameter.
|
set temporary string,_function thinprocess,float,lateralpositionmm,0.001,3 |
Tells the ThinProcess table to get the current value of the column 'lateralpositionmm' as floating point number. The number is multiplied by a factor (which is 0.001 in this example). Finally, the result is formatted as a string using 3 decimals and then copied to the temporary string. You can use the temporary string in subsequent script lines. To use the value as sample position x you can use the following command:
set sample position x,
If the command 'set sample position x' is missing a formula after the comma it uses the temporary string to evaluate the new value.
|
set thinprocess spectrum nickname,Reflection Glass,R set thinprocess spectrum nickname,Transmission,T |
Usually you have no influence on the naming of the spectra in ThinProcess once the database has been generated. As explained above, SCOUT or CODE look for matching names in the ThinProcess table and the list of spectra. If you don't want to follow the ThinProcess naming convention in your SCOUT or CODE models you can translate the ThinProcess names to SCOUT or CODE names with the command 'set thinprocess nickname'. The command takes 2 parameters: First, the original ThinProcess name is specified, followed by the 'matching' SCOUT (or CODE) name. Once you have executed the script lines on the left spectra will be sent to the objects 'R' and 'T', respectively, if the ThinProcess table shows 'Reflection Glass' or 'Transmission' as Resultname.
|
thinprocess load spectra |
This command tells the program to go through all currently shown table records and copy measured spectra to SCOUT or CODE objects with matching names. You should make sure that the number of table records is small - ideally you should have filtered out only those records which are really needed. |